How to Add a Facebook Pop-up Like box to your Blogger blog or website

Leave a Comment
You must have seen the facebook like boxes those pop-up when you enters a website. That pop-up box shows the Facebook like counts and some profile images of the likers showing that people are liking the page on Facebook. This may motivate a visitor to press
Facebook Pop-up Like box in Blogger blog
the like button of the facebook page of a content rich website or blog which will definitely increase the social presence of the blog. This may be useful to spread your voice and increase your reader via facebook. So I myself wondered how bloggers do that in their blogs and did some research. And finally got to know how to achieve the task of showing a pop-up facebook like box on blogger. I am goin to show you how. There are two methods to achieve this. Let me proceed with the first method.
METHOD 1:
Step I: Log in to your blogger account and go to Dashboard.
Step II: Go to ‘Template’, then Click on ‘Edit HTML’. Now you get the HTML editor for your blog template.
Step III: Hold the CTRL + F to find a string and in the search box, search for: </head>.
Step IV: When you get into </head>, copy the following code and paste it just above this tag (when you copy, don’t forget not to copy the line number appearing in the code like 1: ).
   1:  <script src='https://ajax.googleapis.com/ajax/libs/jquery/1.7.1/jquery.min.js?ver=3.3.1' type='text/javascript'/> <script src='http://dl.dropbox.com/u/73386157/codigos/minipopup/jquery.cookie.js' type='text/javascript'/> <script type='text/javascript'> jQuery(document).ready(function($){ if($.cookie('popup_user_login') != 'yes'){ $('#fanback').delay(100).fadeIn('medium'); $('#fanclose, #fan-exit').click(function(){ $('#fanback').stop().fadeOut('medium'); }); } $.cookie('popup_user_login', 'yes', { path: '/', expires: 1 }); }); </script>

Step V: Then after pasting the above code, hold the CTRL + F again and search for: ]]></b:skin> and when you find it, paste the following code above it:

   1:  #fanback{display:none;background:rgba(0,0,0,0.8);width:100%;height:100%;position:fixed;top:0;left:0;z-index:99999} #fan-exit{width:100%;height:100%} #fanbox {background: white;width: 420px;height: 270px;position: absolute;top: 58%;left: 63%;-webkit-box-shadow: inset 0 0 50px 0 #939393;-moz-box-shadow: inset 0 0 50px 0 #939393;box-shadow: inset 0 0 50px 0 #939393;-webkit-border-radius: 5px;-moz-border-radius: 5px;border-radius: 5px;margin: -220px 0 0 -375px;} #fanclose {float: right;cursor: pointer;background: url(https://blogger.googleusercontent.com/img/b/R29vZ2xl/AVvXsEi1cYLpA1qz2KowLj0k2GTB36tGNnzT1I4ggQqTIkM6eQxSuoNivdM5Gz0PyeTRyyY2mPgc7y2MPG2vZtUMxulUB612QwB0jqFajll6ooAjH6Lp_cZI10NumosMuhT8LA8Yb9W6Jokvkv0f/s1600/fanclose.png) repeat;height: 15px;padding: 20px;position: relative;padding-right: 40px;margin-top: -20px;margin-right: -22px;} .remove-borda {height: 1px;width: 366px;margin: 0 auto;background:#F3F3F3;margin-top: 16px;position: relative;margin-left: 20px;}

Step VI: Once again, press CTRL+F and search for <body> and copy-paste the following code below it:

   1:  <div id='fanback'><div id='fan-exit'/><div id='fanbox'><div id='fanclose'/><div class='remove-borda'/> <iframe src="//www.facebook.com/plugins/likebox.php?href= https://www.facebook.com/TechBhuvan&amp;width=402&amp;height=255&amp;colorscheme=light&amp;show_faces=true&amp;border_color=%23E2E2E2&amp;stream=false&amp;header=false&amp;appId=329902783740649" scrolling="no" frameborder="0" style="border: none; overflow: hidden; margin-top: -19px; width: 402px; height: 230px;" allowTransparency="true"></iframe> </div></div>

(Remember to change the yellowed text to the URL of your blogs facebook page.)

Step VII: Now Click on ‘Save Template’ to save the changes you have done to the template. After successful Save, Exit and Check your blog to see it’s working.

METHOD 2: 

You may employ this alternative method to add a pop-up facebook like box to your blogger blog. Here you go:

Step I: After Logging into you blogger blog, go to Layout.

Step II: Add a HTML/JavaScript Gadget and add the following code to the HTML/JavaScript Gadget.

<style>#fanback {display:none;background:rgba(0,0,0,0.8);width:100%;height:100%;position:fixed;top:0;left:0;z-index:99999;}#fan-exit {width:100%;height:100%;}#fanbox {background:white;width:420px;height:270px;position:absolute;top:58%;left:63%;margin:-220px 0 0 -375px;-webkit-box-shadow: inset 0 0 50px 0 #3b60aa;-moz-box-shadow: inset 0 0 50px 0 #3b60aa;box-shadow: inset 0 0 50px 0 #3b60aa;-webkit-border-radius: 5px;-moz-border-radius: 5px;border-radius: 5px;margin: -220px 0 0 -375px;}#fanclose {float:right;cursor:pointer;background:url(https://blogger.googleusercontent.com/img/b/R29vZ2xl/AVvXsEhfJPO6BiVg06TTzHj627EqZDAraebYf9L4ohdp7FtEpfR9ls-HctTKwjldovb3UogLNPtf106Iss5GvjgqXXRrc-Qjf9dBlwasn7CZqEMT16HqfTe5wtAf5I9yM7-jq_iw0PYodLIm-ll1/s1600/popup_exit.png) repeat;height:15px;padding:20px;position:relative;padding-right:40px;margin-top:-20px;margin-right:-22px;}.remove-borda {height:1px;width:366px;margin:0 auto;background:#F3F3F3;margin-top:16px;position:relative;margin-left:20px;}</style><script type='text/javascript'>//<![CDATA[jQuery.cookie = function (key, value, options) {// key and at least value given, set cookie...if (arguments.length > 1 && String(value) !== "[object Object]") {options = jQuery.extend({}, options);if (value === null || value === undefined) {options.expires = -1;}if (typeof options.expires === 'number') {var days = options.expires, t = options.expires = new Date();t.setDate(t.getDate() + days);}value = String(value);return (document.cookie = [encodeURIComponent(key), '=',options.raw ? value : encodeURIComponent(value),options.expires ? '; expires=' + options.expires.toUTCString() : '', // use expires attribute, max-age is not supported by IEoptions.path ? '; path=' + options.path : '',options.domain ? '; domain=' + options.domain : '',options.secure ? '; secure' : ''].join(''));}// key and possibly options given, get cookie...options = value || {};var result, decode = options.raw ? function (s) { return s; } : decodeURIComponent;return (result = new RegExp('(?:^|; )' + encodeURIComponent(key) + '=([^;]*)').exec(document.cookie)) ? decode(result[1]) : null;};//]]></script><script type='text/javascript'>jQuery(document).ready(function($){if($.cookie('popup_user_login') != 'yes'){$('#fanback').delay(100).fadeIn('medium');$('#fanclose, #fan-exit').click(function(){$('#fanback').stop().fadeOut('medium');});}$.cookie('popup_user_login', 'yes', { path: '/', expires: 1 });});</script><div id='fanback'><div id='fan-exit'></div><div id='fanbox'><div id='fanclose'></div><div class='remove-borda'></div><iframe allowtransparency='true' frameborder='0' scrolling='no' src='//www.facebook.com/plugins/likebox.php?href=http://www.facebook.com/TechBhuvan&width=402&height=255&colorscheme=light&show_faces=true&border_color=%23E2E2E2&stream=false&header=false'style='border: none; overflow: hidden; margin-top: -19px; width: 402px; height: 230px;'></iframe></div></div><script src='https://ajax.googleapis.com/ajax/libs/jquery/1/jquery.min.js'></script>

(Change the yellowed text to the facebook Page URL of your blog.)

Step III: Save the Gadget. You are Done.

You can done few customization to the like box. You can change the expire limit of the like box. by default the pop-up will be displayed to the user after one day. To change this time interval, just do a CTRL+F to find expires in the code and change it to the integer you want. That’s it. Have fun. 

Read More...

How to install Android on a PC running Windows, Linux or Mac

Leave a Comment
---- This Tutorial is dedicated on the topic How to Install Android 4.0 Ice Cream
Sandwich on Windows,Linux,Mac. This is a detailed and step by step tutorial with snapshots which will help readers to install android on a PC in the easiest way. ----

Android is a powerful and robust operating system for handheld devices like mobile phones or smartphones and tablet PC's. Android is common in devices nowadays. Android is built upon a monolithic Linux kernel and hence is really powerful and secure operating system. this tutorial is on how you can install Android 4.0 Ice Cream Sandwich on a Personal computer running a Windows, Linux or a Mac OSX operating system. If you cannot afford to buy a tablet running android or you just don't want to buy one, yet you can try Android on your home PC. That is really cool. Since Android is a collaborative open source project, hence android can be downloaded for free of cost and anyone can use it as per his/her convenience. Installing android on a PC is easy but not the same as installing Windows or linux to your PC. Here I will show you how you can install Android 4.0 Ice Cream Sandwich on a PC and experience the power of Android and have fun with it.

To Install Android 4.0 on a PC, you need VirtualBox installed in your host operating system.
Follow the given link and Download the appropriate(If you are running Windows, download Virtual Box for Windows 32 or 64 bit as per the architecture of your system. If you are using Linux or Mac then download accordingly.) version of VirtualBox for your system:
Install Virtual Box. If you need guidance to install Virtual Box, please refer to the official website of VirtualBox.
The next thing you need is the Android operating system cd. Download Android 4.0 Ice Cream Sandwich ISO from this link:

Now, run Virtual Box and follow these steps to install Android in your system.

Step 1: Click on 'New' tab.

Step 2: A new Window will appear with Title 'Welcome to the new Virtual Machine Wizard'. Click 'Next'.
Step 3: Enter any name you like for the Name of the new Virtual Machine. Select 'Operating System' as 'Linux' and Version as 'Linux 2.6'. Click 'Next'.
Step 4: Select the Base Memory size (keep it at least 256 MB) and press Next.
Step 5: Check 'Start up Disk' and Check 'Create new hard disk'. Click Next.
Step 6: Keep 'File Type' as VDI(VirtualBox Disk Image) and click 'Next'. For Storage Details, keep it as 'Dynamically Allocated'.

Step 7: In the next section, make the virtual hard disk size as 8 GB. Click Next and then press Create button.
 Now a new Virtual Machine is created. You now need to install Android 4.0 Ice Cream Sandwich to this virtual machine.
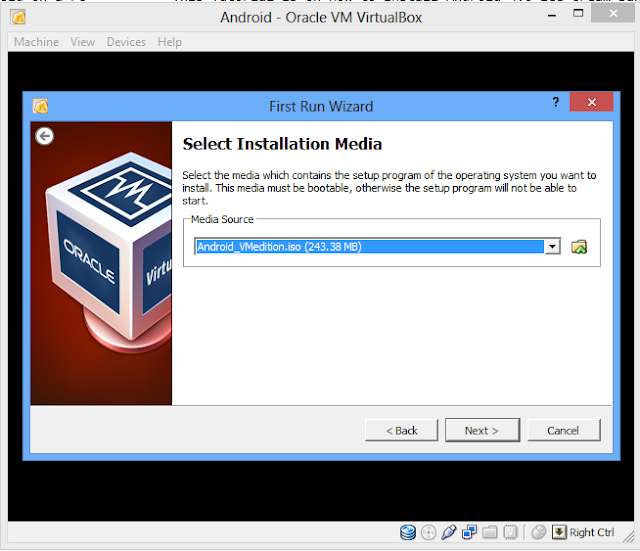
Step 8: Select the newly created virtual machine and click on 'Start' button shown as an arrow -> in the menu. The 'First Run Wizard' will open. Click 'Next'.

Step 9: In the next window, under 'Media Source', browse to the ISO file of Android 4.0 Ice Cream Sandwich which you downloaded earlier. Click 'Next' and then 'Start'.
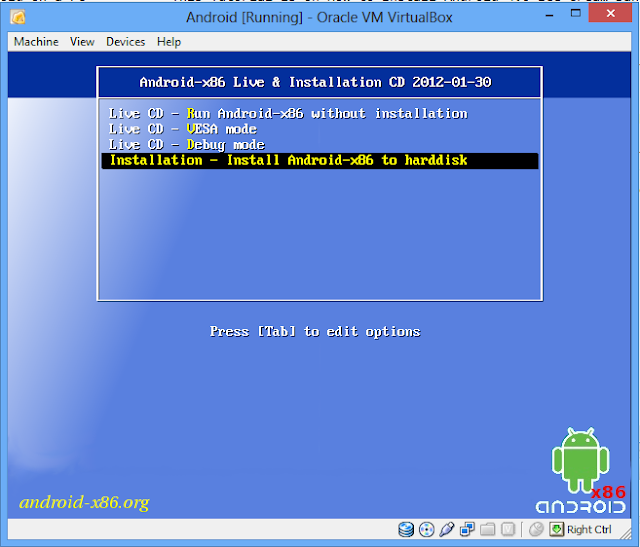
Step 10: The Android Installation Wizard will start. Use the Arrow key of your keyboard and scroll to 'Installation - Install Android x-86 to Hard Disk' and hit Enter. Alternatively you can try Android without installing choosing the first alternative.
Step 11: The installation starts. After few seconds, the installation prompt you to select a partition. Select 'Create/Modify partition' and hit 'Enter'. Next you need to hit Enter>Enter>Bootable>
Step 12: Use your arrow key and go to [Write] in the following screen. Hit 'Enter' and in the next prompt, type yes and press Enter.
Step 13: After writing the partition table, go to [quit] and press Enter.
Step 14: In the next Screen, select the first alternative and hit Enter. Next is the 'Choose Filesystem' menu. Use down arrow key and select 'ext3' and then press OK. Then cofirm formatting by pressing 'Yes'.
Step 15: Confirm installing 'Boot Loader GRUB' by hitting 'Yes'. in the next prompt Click 'Yes' to install system as 'Read/Write'.
After the installation is done, hit 'Run Android-x86'. Voila!!!You are done. You now have Android 4.0 Ice Cream Sanwich installed in your virtual box.
If you like this post, please share it with your friends. Thanks. Enjoy Android.
Read More...

How to add a speaking welcome message to your computer?

2 comments
Have you ever wanted to hear a welcoming voice from your computer when you log into it just like you see in the movies? Would not it be cool if your computer welcomes you in a beautiful voice whenever you log in to your PC? Yes, absolutely. I also like to have fun with the small tweaks in my PC. So how will you make this happen? 
Add speaking welcome message on startup
How your computer will speak? Well, I will show you a small trick using which you can make your computer welcome you at the start up. We will use a simple vb script to do this thing. Let me tell you that, this trick will be applied only on Windows computers, i.e. running Windows XP, Windows Vista or Windows 7 operating systems. Unfortunately this will not work on machines running a Linux flavor. So, let’s move on with the tutorial.
Method I : Downloading the small .vbs file.
·         I have created one vb script file which is ready for you. You can download the .vbs file from here.
·         After downloading, locate the downloaded file and open it with Notepad by right clicking on it and selecting Open With > Notepad.
·         You have to do a minor change in the script
·         Replace the text “Welcome message” with your desired welcome message like Hello or Good morning or Good day or anything you want to hear from your computer and in place of “YourName”, write your real name and save the file.
Alternative Way : Creating your own .vbs file.
1.       Open any text editor like Notepad, Wordpad or Notepad++.
2.       Copy and Paste the following code to your text editor.

Dim message, talk
message="Welcome Message, YourName"
Set talk=CreateObject("sapi.spvoice")
talk.Speak message


3
.       Save the file by clicking on File>Save as  . Give any name in File Name and select All Files(*.*) in Save as Type tab. Give a .vbs extension to the file. E.g. Welcome.vbs.
Now your primary work is complete. Now you have to place the file you have just created to its appropriate place. If you are using a Windows XP operating system, then navigate to the path : C:\Documents and Settings\All Users\Start Menu\Programs\Startup  or if you are using a Windows Vista or Windows 7 operating system then navigate to
C:\Users\ YourUserName\AppData\Roaming\Microsoft\Windows\Start Menu\Programs\Startup.  I am assuming that C is your system drive. If not, then replace C with your system drive letter and replace ‘YourUserName’ with your computer user name. Copy and paste the file you have downloaded or you have just created. Now you are done. The next time you start your PC, it will welcome you with its mechanical female voice along with your name. To check, you can reboot your computer.
For best result, you can change the sound scheme of your computer to ‘No Sounds’. To do so, follow these things:
If you are using a Windows XP system:
*      Go to Control Panel.
*      Switch to Classic View.
*      Click on Sound and Audio Devices.
*      Click on the Sounds tab.
*      In the Sound Scheme option, select ‘No Sound’.
*      Click Ok to save.
If you are using a Windows Vista or Windows 7 PC:
*      Go to Control Panel.
*      Click on Hardware and Sound.
*      Then Click on Sound. Another window opens.
*      Click on Sounds tab.
*      Select ‘No Sounds’ from Sound Scheme option.
*      Apply and press Ok.


You are done. Enjoy.
Read More...

Download and install Laptop driver easily using Slim Drivers.

1 comment
We have all heard of device drivers. But do we know what are these drivers and how do they work? Well, in computing terms, a device driver is a computer program that allows higher-level computer programs and applications to interact with a hardware device e.g. the mouse, keyboard, video board, monitor etc.
But how do they interact with the hardware devices? The driver typically communicates with the hardware device through the computer bus. Without going into the details, we can say that you need to install device driver programs into your computer to get full throughput and utilization of your system.
If you own a laptop, then you might be aware of the driver softwares it required to run the operating system functionalities well. Drivers for performing various tasks improve performance of your computer and give you convenient use of all resources in your computer. Have you recently purchased a laptop and having problem getting the drivers for it? You may have searched the net for your laptop drivers and got frustrated when you have found nothing useful to you. May be you have downloaded some drivers those which are not compatible with your laptop model. If you search for drivers in the official website of your brand, you may get some drivers there but you may not get all device drivers that your machine needs to have installed say graphics solutions as an example. So how will you find it and where? Searching for only device drivers and getting it for the right device and right version is not so easy. When I purchased my first HP laptop, I faced the same problem. The seller told me that they will not give me any device driver CD bundled with my laptop, because it was a DOS version and no other operating system was preinstalled on it. When I installed Windows 7 on it, I had to search for the device drivers like audio device and graphics drivers. But hardly got a solution in the official HP website. I got some driver softwares which did not run on my machine. So I tried for alternative solutions and I got one. Here is a simple solution to your needs. I will show you step by step how can get drivers for your Notebook in a single place. You will be able to get regular update to your PC drivers after following these steps.
1.       Connect to the internet and download Slim Drivers from Slim Ware utilities website. This is freeware software and you will have to pay nothing to obtain a copy of this.
You can download the software by clicking here.
2.       After downloading, run the setup file and install the software. You may need to be connected to the internet becauseit might need to download latest update of the software version.


3.       After installing the slim Driver software by following the installation instructions, reboot your computer and run Slim Drivers. It should look like following.


4.       Click on “Start Scan” to scan for missing and broken drivers in your computer. The available driver update for all devices in your computer will be displayed. Select one by one to install driver. It is recommended that you create a restore point to your system before installing the driver. You will need to check for driver updates periodically to get the latest updates to your drivers.
After installing Slim Drivers, you need not to download and install all device drivers manually, just Start Scanning your PC with Slim Drivers and it will tell you what device drivers you need to install. After clicking install on specific Driver software, it will automatically download the software for you from the best known source. After getting it downloaded, you just need to follow the installation instruction of the driver.

There are other softwares too in the market for this purpose which works similar to Slim Drivers, but you may not get one without cost. You have to purchase one. So my recommendation is that use Slim Drivers which is freely available software. All you need is an account with Slim Ware utilities.
Read More...

How to install Windows executable softwares on Linux, Mac or Solaris

Leave a Comment
Do you really miss your windows softwares when you are working on a Linux box or a Mac?
Use Windows Software in Linux Do you wish you could use your Windows softwares like right from your Linux operating system? In general, Linux, Solaris, Mac and Windows all use different software architecture; so we cannot run Windows softwares on Linux or Linux software packages on Windows systems. But is there any way to use Windows executable softwares from Linux? The answer is definitely positive. You can run Windows softwares on Linux systems too. But to do so, you have to install another software program named Wine on your Linux box. I am operating on a Windows 7 and Ubuntu dual boot PC. Sometimes when I'm using Ubuntu, I want to run some Windows program right from Ubuntu without switching back to Windows. Wine falicitates the purpose very well. I will describe the process of installing and using Wine in simple words in this short tutorial.

What you need to have to run Windows programs on Linux?
You will have to install WineHQ on your Linux system as a prerequisite to run Windows programs. After installing Wine, you will be able to run Windows applications on other Operating Systems like Linux, Solaris or Mac.
What actually is Wine?
Wine is basically a software program which provides facility to run Windows applications right from your Linux system or other operating systems you are using. Are you a web author and miss your image authoring program Adobe Photoshop while using Linux? Well, Wine will perfectly fulfill your requirement and you will be able to run such popular windows applications like Adobe Photoshop, games like Far Cry etc. To know more about wine, you can go to the WineHQ program’s official website http://www.winehq.org.
How do I install Wine on my Linux system?
To install Wine, first download the latest stable release version of WineHQ program, or alternatively you can try installing the developer release version. To download the latest stable version of Wine, click here. To download the developer preview version click here. To select the version of your Wine installation program, visit Wine website clicking here. After downloading the installation package, extract the archive and make build and install it to your system. If you are an Ubuntu Linux user, then open the terminal and type the following:
 sudo apt-get install wine
 Enter your password if asked to, and then the installation will start automatically; and you do not need to download and install the program. You will be asked if you want to proceed, press y to proceed. You have to accept the EULA (End User License Agreement) that appears during the installation process. Press the arrow key and proceed to the finish line of the EULA and press on Accept. Your installation of Wine will be finished in a few minutes. The same process as Ubuntu will be applied to LinuxMint and other Debian based Linux flavors. To install on other versions of Linux box, download the installation package from Wine website and do the following:
a.Extract the installation package using your archive manager, and copy the extracted folder to your home folder.
b.Open the terminal and change your current directory to your home folder using the cd command.
c.Make and Install the package you have just extracted.


I have installed Wine on my Linux system. Now how I install Windows programs on it?
After installing Wine on your system, you will be eager to install and use Windows programs on it. To install any Windows program on your Wine installed machine, first download the Windows software and copy it to your Home directory. Open the terminal and type the following:
Wine
For example, if you want to install Google Chrome on wine, type 'Wine ChromeSetup.exe' without quote.

What softwares does Wine supports?
Wine supports a large number of windows applications to be run on its environment. For the full list of softwares you can run on Wine, visit the wine website or go directly clicking here.

It is showing failure installing applications. What should I do?

Wine may fail to install any windows application because of incompatibility or  incorrect architecture of your operating system; i.e. If you are using a 64 bit version of Linux and trying to install a 32 bit version of Windows application, then this is not going to work. Check the compatibility list of softwares and download the correct version. Enjoy the great experience of using Windows program right from Linux. 
Read More...

How to recover Linux After Installing Windows (Linux-Windows Dual Boot) :: The easiest way

Leave a Comment
Have you experienced the problem with booting your computer with dual copy of Linux and Windows? This is a common problem in a Windows-Linux dual boot PC. If somehow you need to re-install your Windows version, then the Linux partition disappeared. You can bring your Linux back easily. Just follow this article.

May be you had two operating systems installed in your PC, one Linux and the other is
Recover Linux After installing Windows
Windows and somehow you need to reinstall your Windows copy. After reinstalling Windows, the previous GRUB is rewritten and now your Linux system is not shown in your boot menu. Well I have also faced this problem and tried to get rid of the same and searched the net for a solution. Most likely you are not interested in formatting your Linux system and reinstalling it, because that will erase all your necessary documents and files from the Linux partition. So what to do? You want both Windows and your Linux on the same computer and you want your previous Linux installation back into work. Here I will show you some tips to get your Linux operating system back along with Windows.
If you search on the web how to recover Linux after installing Windows, most of the techies will tell you to start doing it in the terminal way writing commands in the terminal. But of course there is easier way to do this. If you are not so technically sound or do not want to remember the long commands that you need to type, then go ahead, I’m going to tell you the easiest way to get back to your Linux installation.
I’m using Ubuntu Linux and will describe the recovery process considering Ubuntu OS, but this should work on most of the Linux flavors. Here we go.
1.       Get a copy of Boot Repair CD. To download the ISO image, click here.
2.       Burn the ISO image into a CD or make your USB flash drive bootable with this ISO. To make a flash/pen drive bootable, you need to burn the ISO into it with softwares like Linux Live USB Creator (Get it from Here) or Universal USB Installer (Get it from Here). If you need help getting your flash drive bootable, please check this Hub: How to use your flash drive to try Linux without installing or install Linux from USB flash drive.
3.       Now boot with the Boot repair CD or your flash drive selecting appropriate boot device.
4.       After booting into your new OS, you will see Boot repair running. Select Recommended Recovery option. After successful recovery, reboot your computer and there you will see the list of operating systems you previously had, in the boot menu.
  There is another option to recover Linux system if you don’t want to try the above described option. This is how you will do this:
First you need to have a live copy of your Linux CD. If you do not have one, then download one from the web and burn it to a CD. Alternatively, you can make a live flash drive or pen drive using the live CD. To make flash drive bootable, see above description.
After getting the Linux distribution and equipped with your live version of it, you are ready to go. Boot into Linux using your live CD or flash drive. Then install Boot Repair typing the following commands to the terminal:

sudo add-apt-repository ppa:yannubuntu/boot-repair
sudo apt-get update
sudo apt-get install boot-repair

or type this:

sudo add-apt-repository ppa:yannubuntu/boot-repair && sudo apt-get update
sudo apt-get install -y boot-repair && boot-repair


after getting installed, click on recommended recovery option and it will recover your previous boot options. Reboot your computer and see in your own.    
Read More...

How to make your flash drive bootable to try Linux without installing it

Leave a Comment
Hello everyone. Nowadays, most of the Linux distributions allow you to try the operating
system before you install it into your computer. This is very helpful if you don’t want to install a Linux variant in your computer but just try one. Or if your system is somehow crashed and you have to format the whole partitions of your computer but you need to back up your files and documents/data from that machine, then booting it using a Linux Live CD may be extremely helpful. Today, most of the Linux distributions like Ubuntu, Debian, fedora, Open SUSE, Linux Mint, Free BSD, Arch Linux, CentOS, Clone Zilla and many more provides option to run the Operating system Live from an USB flash drive. If you do not have a CD ROM drive in your computer, then also this option will be very helpful to get you installed a Linux flavor on your machine. Okay, now come to the point and get your USB flash drive bootable with your Linux distribution version. Here the steps involved:
1.       Get a copy of one of the following softwares:
a.       Linux Live USB Creator (Get Here)
b.      UnetBootin (Get Here)
c.       Universal USB Installer (Get Here)
2.       Download a copy of ISO image of your intended Linux version.
3.       Install and run one of the previously mentioned USB creator software.
4.       Select the ISO image as source to burn to the USB device. Insert the flash drive and start making copy of Linux to your flash drive.

5.       After completion, reboot your computer with the USB flash drive as the Boot device. Try or install the Linux flavor from your live USB.
Read More...

How to use MTS Mblaze on Linux, Ubuntu 11.04, 12.04 or higher

1 comment
MTS MBlaze is supported in Windows, Linux and Mac OS. But some users experience
problem getting it connected to the Internet while using on a Ubuntu machine. MTS MBlaze can easily be set up in Ubuntu in two easy ways.

  • Using driver software which included in the modem itself.
  • And without any driver software.

Using recommended driver software to set up MTS Mblaze

The modem itself contains the driver software for both RPM and DEB based GNULinux distros, Mac OS and Windows. From the given packages, Ubuntu users have to install CrossPlatformUI-V2.1.2-SSTL-i386-ubuntu.deb package. If you are using 32 bit Ubuntu then quite easy to install the package. Just install it after connecting the USB Modem. But, if you have 64 bit Ubuntu then this one is not going to work as it is build for 32 bit systems only. For that we need to re-build this 32 bit only debian package into 64 bit also driver software.
If you are not familiar with executing commands in terminal or do not want to spend your valuable time, simply download the package provided below which we had re-built ourselves.
And install this package by simply double clicking on it after connecting the modem. It should work fine.
Alternatively, to install the 32 bit package as a 64 bit driver software,perform the following actions(In this case, you need a working Internet connection):
1. First you need to install Dpkg. Dpkg is a terminal based application that help to install, remove, unpack, build the *.deb package files.
2. To install Dpkg, connect to Internet and execute sudo apt-get install dpkg in terminal.
3. Extract CrossPlatformUI-V2.1.2-SSTL-i386-ubuntu.deb file.
4. Open extracted directory->DEBIAN and open control file in a text editor.
5. Now replace the Architecture from i386 to all.
6. Save the file and close it.
7. Now to make a new .deb file, execute sudo dpkg -b in your terminal.
For example, sudo dpkg -b CrossPlatformUI-V2.1.2-SSTL-i386-ubuntu CrossPlatformUI-V2.1.2-SSTL-ALL-ubuntu.deb
Now you will find new CrossPlatformUI-V2.1.2-SSTL-All-ubuntu.deb file has built along with the extracted directory. This is the same one which we have provided above to download. Install this driver package after connecting the USB Modem. 

Without any driver software

MTS MBlaze USB Modem also can be used without installing driver software since latest version of Ubuntu (or any other GNULinux distro) support this modem by default. It should be at least 10.04 or greater version of Ubuntu.
Connect the modem with the PC. The system will detect the device automatically.
Look out for the notification saying Device recognized USB Modem, ONDA Communication S.p.A., then click on the icon of Network Connections in system tray.
You will find an option New Mobile Broadband (CDMA) Connection, click on it.
A new window will open to setup a mobile broadband connection. Click Forward button
Select India as country, then Forward,
Select MTS MBlaze from the providers’ list, Forward,
And then click Apply,
Now Disconnect the connection which is trying to connect automatically. Because it is not going work until we provide username and password.
Open Edit Connections->Mobile Broadband (Tab)->Select MTS MBlaze Connection and click onEdit.
Under Mobile Broadband, type internet@internet.mtsindia.in as username and MTS aspassword.
Check Available to all users and Connect automatically if you want.
Save it and close Network Connections.
Now unplug the modem from the port and reconnect it.
After the modem get recognised by the system, try to connect Internet.
If everything goes right, you will see that your Internet connection will get connected.

Third Method:

There is another method to connect to Internet via MTS Mblaze modem. You do not need proprietary driver software, but need to install one small application. MTS Mblaze maynot work on all systems running Ubuntu 12.04 or Higher. Here is how you can solve the problem.

1. Install wvdial running the following command in your terminal:
    sudo apt-get install wvdial

2. Install usb-modeswitch and usb-modeswitch-data from Ubuntu Software Center (Just search for the packages and hit install)

3. Edit /etc/wvdial.conf file running the following command:
    sudo gedit /etc/wvdial.conf

4. Add the following lines to the file:


[Dialer mts]
Stupid Mode = 1
Inherits = Modem0
Password = mts
Username = internet@internet.mtsindia.in
Phone = #777
[Modem0]
Init1 = ATZ
SetVolume = 0
Modem = /dev/ttyUSB0
Baud = 115200
FlowControl = Hardware (CRTSCTS)
Dial Command = ATDT

5. Save the file, close it and issue:
    sudo wvdial mts

This will give an output similar to:


--> WvDial: Internet dialer version 1.61
--> Initializing modem.
--> Sending: ATZ
OK
--> Modem initialized.
--> Sending: ATDT#777
--> Waiting for carrier.
ATDT#777
CONNECT 3100000
--> Carrier detected.  Starting PPP immediately.
--> Starting pppd at Sun May  6 18:35:05 2012
--> Pid of pppd: 7231
--> Using interface ppp0
--> local  IP address 116.202.159.156
--> remote IP address 10.228.138.131
--> primary   DNS address 10.228.129.114
--> secondary DNS address 10.228.129.113

If you get an error, disconnect your device. Reconnect and wait for about 20 seconds. Then issue this command from terminal:
sudo wvdial mts

Leave the terminal as such. Open your browser and check if internet is working or not.
To disconnect internet, kill the process by pressing Ctrl+c in the terminal.

You can also create an alias to this command.
Edit .bashrc in your home folder and add the following line to it:

alias mts='sudo wvdial mts'

Save it.
Now, you can start using MBlaze just by issuing mts.

Note: Credentials you need to remember:
Username: internet@internet.mtsindia.in 
Password: MTS or mts
Number: #777

(The information provided in this post is not original, it is collected from various sources in the Internet and I am just reposting...Hope this will help you.)
Read More...

How to make Blogger Sidebar Floating

3 comments
---This tutorial is about adding a floating sidebar to your blogger blog. It illustartes how you can add a floating sidebar which floats up and down when the blog page changes its position from top to bottom or bottom to top.--- Do you know you can change your sidebar to
a floating bar? This tutorial explains, how to change your existing sidebar in to floating bar. This technique can be applied to a single widget instead of whole sidebar, so that widget only floats along with scrolling. This can be achieved by adding a Javascript code to your blog. Follow these steps to add this amazing feature to your blogger blog. Step 1: You need jQuery plugin installed in your blogger blog. If you have previously added this plugin, then you may skip this step and go to next section. Log in to your Blogger Dashboard and go to Template --> Edit HTML and Proceed. Then press Ctrl+f and enter </head> to the search box. Where you get </head> tag, add the following code just above the </head> tag.
<script src='https://ajax.googleapis.com/ajax/libs/jquery/1.5.1/jquery.min.js' type='text/javascript'/>
Step 2: Now search for(Ctrl+f is a shortcut for searching) any one of below codes. In default templates
<div class='column-right-outer'>
Or in most of the custom blogger templates search this one(Note: If you can't find it out, your id is a different one)
<div id='sidebar-wrapper'>
Step 3: When you get the searched item, Just copy the below javascript code and paste it above the above code.
<script type="text/javascript">
        $(function() {
            var offset = $(".column-right-outer").offset();
            var topPadding = 15;
            $(window).scroll(function() {
                if ($(window).scrollTop() > offset.top) {
                    $(".column-right-outer").stop().animate({
                        marginTop: $(window).scrollTop() - offset.top + topPadding
                    });
                } else {
                    $(".column-right-outer").stop().animate({
                        marginTop: 0
                    });
                };
            });
        });
    </script>
Replace .column-right-outer with your corresponding value(if you are using other templates). For custom templates, the value can be anything like sidebar-wrapper. For example, if it is id="somename", replace the code with #somename and if it is class='somename', then replace with .somename. If you want to animate any other widget, instead of the whole sidebar, find its Id or class and replace it with green colored text. Hope this helps. If you need any help, comment below. Enjoy blogging!!! :)
Read More...

How to add Fade effect to images in your Blogger blog

Leave a Comment
This is a cool trick. Using some jQuery code, you can tweak the look of the images in your blog or website. When you hover the mouse button over an image, the image fades out. This is simply a visual enhancement to your blog. To try this, follow these steps:

Step 1: Log in to your Blogger Dashboard and go to Templates>Edit HTML.
Step 2: Scroll down to where you see <head> or alternatively press Ctrl+f and enter <head> to the search box appeared.
Step 3: Copy below code and paste it just before the </head> tag .
<script src='https://ajax.googleapis.com/ajax/libs/jquery/1.6.4/jquery.min.js' type='text/javascript'/>
<script type='text/javascript'>
$(document).ready(function(){
$(".post img").fadeTo("slow", 1.0); // This sets the opacity of the thumbs to fade down to 30% when the page loads
$(".post img").hover(function(){
$(this).fadeTo("slow", 0.5); // This should set the opacity to 100% on hover
},function(){
$(this).fadeTo("slow", 1.0); // This should set the opacity back to 30% on mouseout
});
});
</script>
<script type='text/javascript'>
$(document).ready(function(){
$(".latest_img").fadeTo("slow", 1.0); // This sets the opacity of the thumbs to fade down to 30% when the page loads
$(".latest_img").hover(function(){
$(this).fadeTo("slow", 0.5); // This should set the opacity to 100% on hover
},function(){
$(this).fadeTo("slow", 1.0); // This should set the opacity back to 30% on mouseout
});
});
</script>
Step 4: Save your Template. You are done. To check whether it is working or not, Open any post with images of your blog and see it yourself. Enjoy blogging!! :)
Read More...

How to Add a 'Go to Top' and 'Go to Bottom' Image link to your Blogger Blog

Leave a Comment

Adding a 'Go to Top' and 'Go to Bottom' link to your blog will help your visitors easily traverse your blog page. If you have a long post and soe reader wants to go to top or bottm instantly, he needs to scroll all the way up and down which consumes time. If you add a link to go to Top and Bottom which will float accrding to your visitor moves around your blog post, will it not be cool? The reader can instantly go to Top and Bottom in just one click. Here is how you can do so in your blog. just follow these steps and thank me.
Step 1: Log in to your Blogger account dashboard.
Step 2: Go to Template, click on the Edit HTML button.
Step 3. Check the "Expand Widget Templates" box.
Step 4. Search (You can use shortcut using Ctrl+f and entering the code below in the searchbox) for the following piece of code:
]]></b:skin>
Step 5: Copy the following javascript code and paste it just above this code, :
/* Go to Top and Bottom jQuery by http://learnatleisure.blogspot.com ----------------------------------------------- */
.button_up{
padding:7px; /* Distance between the border and the icon */
background-color:white;
border:1px solid #CCC; /* Border Color */
position:fixed;
background: white url(https://blogger.googleusercontent.com/img/b/R29vZ2xl/AVvXsEh7QV8Mbw58UapP9551rpYiUvyTrdhwb3IeCxS7J5JjuiICWxpBpyIfRBQKcKNXt1X0tJvKApRlZLRhAOjsPBTEB7GLTvBHOk6l9AifZhrEsaY2C1aZunXHKG6bSvQ-SaNwp9HuVwcdzlQ/s16/arrow_up.png) no-repeat top left;
background-position:50% 50%;
width:20px; /* Button's width */
height:20px; /* Button's height */
bottom:280px; /* Distance from the bottom */
right:5px; /* Change right to left if you want the buttons on the left */
white-space:nowrap;
cursor: pointer;
border-radius: 3px 3px 3px 3px;
opacity:0.7; 
filter:progid:DXImageTransform.Microsoft.Alpha(opacity=70);
}
.button_down{
padding:7px; /* Distance between the border and the icon */
background-color:white;
border:1px solid #CCC; /* Border Color */
position:fixed;
background: white url(https://blogger.googleusercontent.com/img/b/R29vZ2xl/AVvXsEhRImed0M78EBD49Lm0gwFKtzEQuMjQg4LX3HVzCfRHnbLZ34anwpMb-NxpJymCYVxri_m1Wz5I5idfTKkyubZygvnss644R0mL1utK9e5FsYSKLkp2BU3hA4gIhg1G9RKqOI1zFSs1Iys/s16/arrow_down.png) no-repeat top left;
background-position:50% 50%;
width:20px; /* Button's width */
height:20px; /* Button's height */
bottom:242px; /* Distance from the bottom */
right:5px; /* Change right to left if you want the buttons on the left */
white-space:nowrap;
cursor: pointer;
border-radius: 3px 3px 3px 3px;
opacity:0.7;
filter:progid:DXImageTransform.Microsoft.Alpha(opacity=70);
}
Note: - You can change the arrows by changing the URLs in blue.
- To change the buttons background color of buttons, change the white text with your color.
Step 6: Now search (use shortcut Ctrl + f) for this tag:
</body>
Step 7. And just above it, paste the following code which will add the jQuery plugin to your blog. If you have previously installed the jQuery plugin, then you may ommit the first line of code.
<script src='http://ajax.googleapis.com/ajax/libs/jquery/1.7.1/jquery.min.js' type='text/javascript'/>

<div class='button_up' id='button_up' style='display:none;'/>
<div class='button_down' id='button_down' style='display:none;'/>

<script>
//<![CDATA[
(function(){var special=jQuery.event.special,uid1='D'+(+new Date()),uid2='D'+(+new Date()+1);special.scrollstart={setup:function(){var timer,handler=function(evt){var _self=this,_args=arguments;if(timer){clearTimeout(timer)}else{evt.type='scrollstart';jQuery.event.handle.apply(_self,_args)}timer=setTimeout(function(){timer=null},special.scrollstop.latency)};jQuery(this).bind('scroll',handler).data(uid1,handler)},teardown:function(){jQuery(this).unbind('scroll',jQuery(this).data(uid1))}};special.scrollstop={latency:300,setup:function(){var timer,handler=function(evt){var _self=this,_args=arguments;if(timer){clearTimeout(timer)}timer=setTimeout(function(){timer=null;evt.type='scrollstop';jQuery.event.handle.apply(_self,_args)},special.scrollstop.latency)};jQuery(this).bind('scroll',handler).data(uid2,handler)},teardown:function(){jQuery(this).unbind('scroll',jQuery(this).data(uid2))}}})();

$(function() {
var $elem = $('body');
$('#button_up').fadeIn('slow');
$('#button_down').fadeIn('slow'); 
$(window).bind('scrollstart', function(){
$('#button_up,#button_down').stop().animate({'opacity':'0.2'});
});
$(window).bind('scrollstop', function(){
$('#button_up,#button_down').stop().animate({'opacity':'1'});
});
$('#button_down').click(
function (e) {
$('html, body').animate({scrollTop: $elem.height()}, 800);
} );
$('#button_up').click(
function (e) {
$('html, body').animate({scrollTop: '0px'}, 800);
} );});
//]]>
</script>
Step 8: You are almost done. Save your Template. Happy Blogging! :)
Read More...