How to Access Linux Partition from Windows

Leave a Comment
Linux is the most preferred option for programmers, hackers and pen testers. But, for common people who does not have or have little programming knowledge prefer to use Windows because of its easy to use graphical design and interface. I am personally a Linux lover but have Windows also installed on my computer in another partition. If you are like me, you may be also using a dual boot computer which boots both Linux and Windows.
If you have both Linux and Windows installed on your computer and you use both operating systems in different occasions, then you may have noticed that, you can access your Windows partition when you are working on Linux, but you cannot access your Linux partition when operating from Windows. So, if you have stored some important document on your Linux partition and you need it to use when you are working on Windows, then you have no option other than rebooting to Linux and copying your files to Windows partition then again come back to Windows. However, this will take a lot of time of yours. So, if there is a way to access Linux partition directly from Windows, then is not that great? Yes, that is indeed possible to access Linux partition from Windows. I am going to tell you how to do that.
To access Linux partition from Windows, you need an application called Diskinternals Linux Reader. I will now tell you the process step by step.

Download Diskinternals Linux Reader windows application from below link.
Download

click to download

4.3 MB .exe


After downloading is completed, open the setup file to install the application. If you have low privilege, run the installer as Administrator. During installation, apply option to create a shortcut in Desktop.  
After installation is done, open the application by double clicking on the icon on your Desktop.
Now you can see all the disk partitions on your computer whether it is NTFS or FAT or ext3. You will also see the Linux Swap partitions.
Click on your Linux installed partition and open it. You will now see all files and folders present in your Linux drive. Locate your required files and copy it to your Windows drive partition.
DiskinternalsThat is it. You can now explore files on Linux partitions directly from Windows without switching into Linux. If you are helped, then please share this article. Thanks.Thumbs up
Read More...

50 Windows 8 Keyboard Shortcuts to Make your Works Easier

Leave a Comment
Hi everyone, Here is a list of keyboard shortcuts you can use to work smartly with Windows 8. Windows 8 is a brilliant Operating System which comes with many wonderful features to work on every aspect of life ranging from simple calculation, web browsing, documenting something to creating a movie, creating an animation etc. You can do lot of things with Windows 8. You can work more elegantly and can save your time your work consumes when you know some simple keyboard shortcuts. Of course, there is always a graphical way to achieve some task in

Windows. That means you can perform something by clicking somewhere on the screen, opening some icon, typing a command etc. But isn’t it really cool when you can perform the same task using just one or two keystrokes? That is why, I have compiled a list of Windows 8 keyboard shortcuts which I believe you will love definitely.

Windows 8 Keyboard Shortcuts List

Windows Key + D Show Desktop
Windows Key + M Opens desktop mode and minimizes all windows
Windows Key + C Open Charms Menu
Windows Key + Tab Cycle through open apps (except desktop apps)
Windows Key + Spacebar Switch input language and keyboard layout
Windows Key + Ctrl+Spacebar Change to a previously selected input
Windows Key + Q Search For Installed Apps
Windows Key + I Charms Menu – Settings
Windows Key + K Charms Menu – Devices
Windows Key + H share Charms Menu
Windows Key + F Search Charms Menu
Windows Key + E Launch Windows Explorer Window
Windows Key + X Show Advanced Windows Settings Menu
Windows Key + L Lock PC and go to lock screen
Windows Key + R Open Run dialog box
Windows Key + Up Arrow Maximize current window
Windows Key + Down Arrow Minimize current window
Windows Key + Left Arrow Maximize current window to left side of the screen
Windows Key + Right Arrow Maximize current window to right side of the screen
Windows Key + Print Screen Takes a Print Screen and saves it to your Pictures folder
Windows Key + Enter Open Narrator
Windows Key + P Choose secondary display modes
Windows Key + U Open Ease of Access Center
Windows Key + + Zoom in using Magnifier
Windows Key + - Zoom out using Magnifier
Windows Key + V Cycle through notifications
Windows Key + F1 Open Windows Help and Support
Alt + F4 Quit Modern UI Apps
Windows Key + Pause Break Display System Properties
Shift + Delete Permanently delete files without sending it to Recycle Bin
Esc Stop or exit the current task
Control + Y Redo an action
Control + Z Undo an action
F2 Rename the selected item
F3 Search for a file or folder
F4 Display the address bar list in the File Explorer
F5 Refresh the active window
F10 Activate the menu bar in the active app
Alt + Enter Display properties for the selected item
Windows Key + Ctrl + spacebar Change to previously selected input
Windows Key  + Shift + M Restore all minimized Windows
Ctrl + Shift + Escape Open Task Manager
Windows Key + Shift + V Cycle through notifications in reverse order
Windows Key + Shift +Spacebar Switch to previous input language and keyboard layout
Windows Key + 0 to 9 Launch/show app pinned to taskbar at indicated number
Windows Key + Shift + 0 to9 Launch new instance of app pinned to taskbar at indicated number
Control + C Copy the selected item
Control + X Cut the selected item
Control + V Paste the selected item
If you like this, please share among your friends. Because sharing increases knowledge. Thanks.

Read More...

20 Smart Windows 7 Keyboard Shortcuts

Leave a Comment
Here is a list of Twenty smart Windows 7 Keyboard Shortcuts applying which you can save time while using your computer. If you are using Windows 7 for yourSmart Windows 7 keyboard shortcurts business, for your personal work or any other purpose, you should know these keyboard shortcuts so that you can save time surfing around. Windows 7 is a great and feature rich operating system which can be handled very cleverly and perform jobs very smartly. Just take a look at the following keyboard shortcuts.


From Desktop try the following


 Windows KeyEase of Access keyboard shortcuts_html_28ff7d19 + Tab = Aero [press Tab to cycle between Windows]
 Windows Key
Ease of Access keyboard shortcuts_html_28ff7d19 + E = Windows Explorer is launched.
 Windows Key
Ease of Access keyboard shortcuts_html_28ff7d19 + R = Run Command is launched.
 Windows Key
Ease of Access keyboard shortcuts_html_28ff7d19 + F = Search (which is there in previous Windows versions too)
 Windows Key
Ease of Access keyboard shortcuts_html_28ff7d19 + X = Mobility Center
 Windows Key
Ease of Access keyboard shortcuts_html_28ff7d19 + L = Lock Computer (It is there from the earlier versions as well)
 Windows Key
Ease of Access keyboard shortcuts_html_28ff7d19 + U = Ease of Access
 Windows Key
Ease of Access keyboard shortcuts_html_28ff7d19 + P = Projector
 Windows Key
Ease of Access keyboard shortcuts_html_28ff7d19 + T = Cycle Super Taskbar Items
 Windows Key
Ease of Access keyboard shortcuts_html_28ff7d19 + S = OneNote Screen Clipping Tool [requires OneNote]
 Windows Key
Ease of Access keyboard shortcuts_html_28ff7d19 + M = Minimize All Windows
 Windows Key
Ease of Access keyboard shortcuts_html_28ff7d19 + D = Show/Hide Desktop
 Windows Key
Ease of Access keyboard shortcuts_html_28ff7d19 + Up = Maximize Current Window
 Windows Key
Ease of Access keyboard shortcuts_html_28ff7d19 + Down = Restore Down / Minimize Current Windows
 Windows Key
Ease of Access keyboard shortcuts_html_28ff7d19 + Left = Tile Current Window to the Left
 Windows Key
Ease of Access keyboard shortcuts_html_28ff7d19 + Right = Tile Current Windows to the Right [Continue pressing the Left and


Right keys to rotate the window as well


 Windows Key
Ease of Access keyboard shortcuts_html_28ff7d19 + # = Quicklaunchkeyboard shortcuts
 Windows Key
Ease of Access keyboard shortcuts_html_28ff7d19 + = = Magnifier


From Windows Explorer


 Alt + Up = Go up one level
 Alt + Left/ Right = Back/ Forward

Read More...

How to install Android 4.2 (JellyBeen) on a PC, Laptop running Windows, Linux or Mac

Leave a Comment
This compact tutorial is about how to install Android 4.2 Jelly Bean on a computer running Windows, Linux or Mac or other operating system. This tutorial describes the installation process in snapshots and every caution is taken to make it easier.

          Android being the most widely used mobile operating system, rules the smartphone and tablet devices market all over the world. You can find Android really usable with handy features and tools integrated to it. Android rules the market of smartphones, tablets and phablets operating system in terms of users. Most devices in the world run Android today, more than iOS (operating system that runs on iPhone) and Windows Phone. Android runs on a specific technology called Dalvic Virtual Machine, so useful for mobile devices. However, Andorid can be installed on a PC running on Intel x86 architecture or similar. In this compact
tutorial, I am going to show you how you can install Android 4.2 Jelly Bean on a computer running a Windows operating system or a Mac or in a Linux box. I will make the things point to point ans step by step.
Requirements:
You have a computer running a full featured operating system, let it be Windows, Linux or Mac or Solaris or whatever operating system you are running. Now you want to run android Jelly Bean on it. You will basically need these things to use Android on your PC.
1.Oracle VM VirtualBox
2.Android x86 4.2 Image

How you play the olympics:

Step 1: Download Virtual Box from the official website. Download the version specific to the operating system you are running. After download is complete, you know that you are going to install Virtual Box on your Computer. So you installed it.

Download

from official website

click to download

Step 2: You have one important component now to run android on your PC. Now you need the most important one, the Android x86 4.2 Jelly Bean ISO image. Download it from below.

Download ISO

Android

click to download

Alternatively, you can go to the x86 Android official site and download a copy of ISO image from there.
Step 3: Installation of Virtua Box is done, you have downloaded the Android Jelly Bean x86 ISO image and you are ready to go. So you are looking for the next step. Open Virtual Box and select New.In the dialog box enter the name as Jelly Bean or Android or as your wish and select
i)Type : Linux
ii)Version : Other Linux and select Next.


Step 4:
In the next dialog box enter the memory size as your wish. You may grant as much as memory you want depending on the RAM you have installed on your machine.Note that minimum 512 MB is required to run Android Jelly Bean. So give accordingly and select Next


Step 5:
In the next dialog box select create a virtual hard drive now. Then select VDI and select fixed or dynamically allocated as your wish and create the virtual drive. I recommend you to choose dynamically allocated option because it will not be occupying extra space even if you are not using them.

Step 6:
Select Virtual device and select settings, a dialog box appears. In the dialog box select 
i)Storage->Storage Tree->Empty
ii)In the attributes section give the full path to the Android 4.2 x86 ISO file you have downloaded and check
Live CD/DVD, then click OK.


Step 7:
Now hit Start to start the virtual machine. In the next screen select Install Android-x86 to hard disk.

Step 8:
In the next screen select Create/Modify Partition. Then create a new primary bootable partition and select write. After finishing, select quit.

Step 9:
Now install android in sda1 and select type as ext3 , choose 'Yes' for installing grub.

Step 10:
After installation completes, remove live ISO of Android Jelly Bean x86 from Virtual Box and reboot your virtual machine. Now you can boot into Android 4.2.2 and ready to use it on your computer. Your Android 4.2 Jelly Bean is up and running.


If you liked this tutorial. please like us on Facebook. Share on Facebook, Twitter, Google+ etc. Thanks.
Read More...

How to install Android on a PC running Windows, Linux or Mac

Leave a Comment
---- This Tutorial is dedicated on the topic How to Install Android 4.0 Ice Cream
Sandwich on Windows,Linux,Mac. This is a detailed and step by step tutorial with snapshots which will help readers to install android on a PC in the easiest way. ----

Android is a powerful and robust operating system for handheld devices like mobile phones or smartphones and tablet PC's. Android is common in devices nowadays. Android is built upon a monolithic Linux kernel and hence is really powerful and secure operating system. this tutorial is on how you can install Android 4.0 Ice Cream Sandwich on a Personal computer running a Windows, Linux or a Mac OSX operating system. If you cannot afford to buy a tablet running android or you just don't want to buy one, yet you can try Android on your home PC. That is really cool. Since Android is a collaborative open source project, hence android can be downloaded for free of cost and anyone can use it as per his/her convenience. Installing android on a PC is easy but not the same as installing Windows or linux to your PC. Here I will show you how you can install Android 4.0 Ice Cream Sandwich on a PC and experience the power of Android and have fun with it.

To Install Android 4.0 on a PC, you need VirtualBox installed in your host operating system.
Follow the given link and Download the appropriate(If you are running Windows, download Virtual Box for Windows 32 or 64 bit as per the architecture of your system. If you are using Linux or Mac then download accordingly.) version of VirtualBox for your system:
Install Virtual Box. If you need guidance to install Virtual Box, please refer to the official website of VirtualBox.
The next thing you need is the Android operating system cd. Download Android 4.0 Ice Cream Sandwich ISO from this link:

Now, run Virtual Box and follow these steps to install Android in your system.

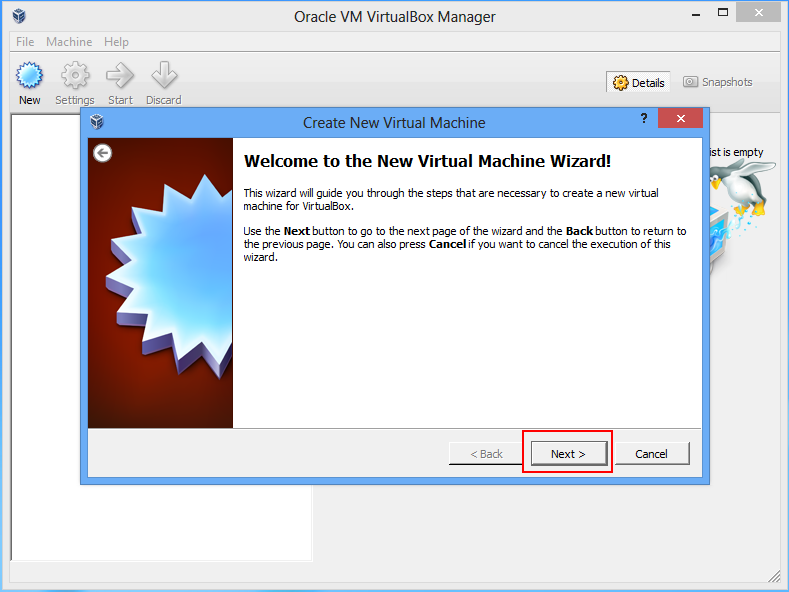
Step 1: Click on 'New' tab.

Step 2: A new Window will appear with Title 'Welcome to the new Virtual Machine Wizard'. Click 'Next'.
Step 3: Enter any name you like for the Name of the new Virtual Machine. Select 'Operating System' as 'Linux' and Version as 'Linux 2.6'. Click 'Next'.
Step 4: Select the Base Memory size (keep it at least 256 MB) and press Next.
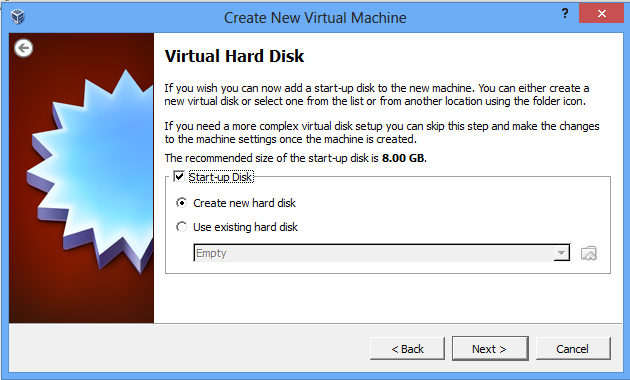
Step 5: Check 'Start up Disk' and Check 'Create new hard disk'. Click Next.
Step 6: Keep 'File Type' as VDI(VirtualBox Disk Image) and click 'Next'. For Storage Details, keep it as 'Dynamically Allocated'.

Step 7: In the next section, make the virtual hard disk size as 8 GB. Click Next and then press Create button.
 Now a new Virtual Machine is created. You now need to install Android 4.0 Ice Cream Sandwich to this virtual machine.
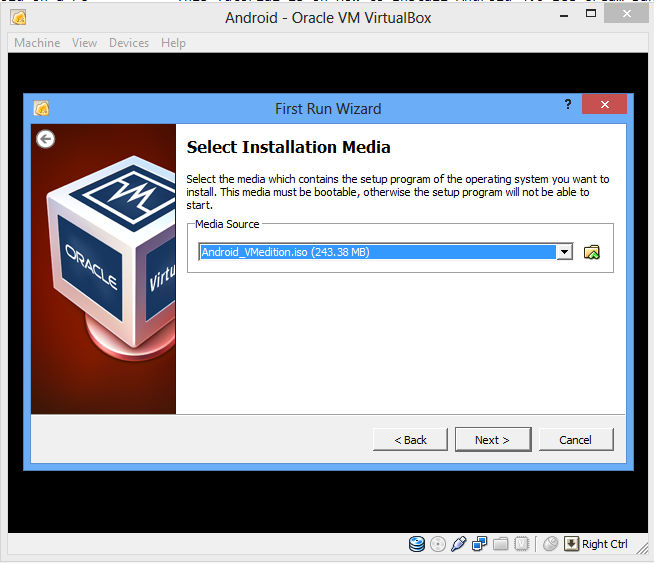
Step 8: Select the newly created virtual machine and click on 'Start' button shown as an arrow -> in the menu. The 'First Run Wizard' will open. Click 'Next'.

Step 9: In the next window, under 'Media Source', browse to the ISO file of Android 4.0 Ice Cream Sandwich which you downloaded earlier. Click 'Next' and then 'Start'.
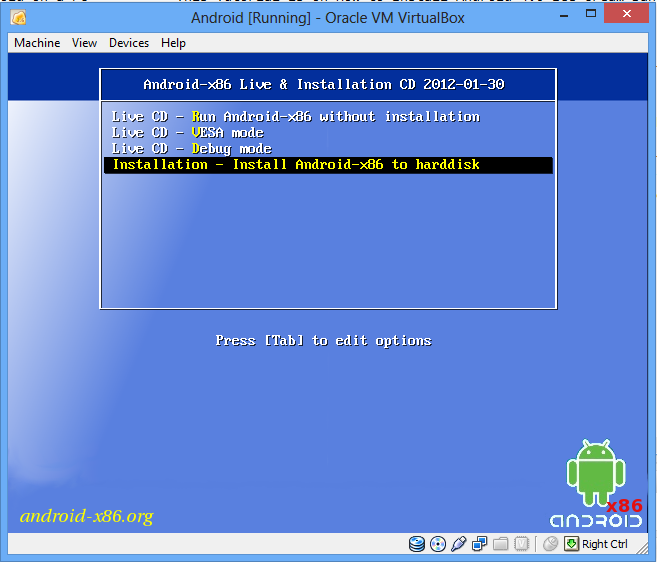
Step 10: The Android Installation Wizard will start. Use the Arrow key of your keyboard and scroll to 'Installation - Install Android x-86 to Hard Disk' and hit Enter. Alternatively you can try Android without installing choosing the first alternative.
Step 11: The installation starts. After few seconds, the installation prompt you to select a partition. Select 'Create/Modify partition' and hit 'Enter'. Next you need to hit Enter>Enter>Bootable>
Step 12: Use your arrow key and go to [Write] in the following screen. Hit 'Enter' and in the next prompt, type yes and press Enter.
Step 13: After writing the partition table, go to [quit] and press Enter.
Step 14: In the next Screen, select the first alternative and hit Enter. Next is the 'Choose Filesystem' menu. Use down arrow key and select 'ext3' and then press OK. Then cofirm formatting by pressing 'Yes'.
Step 15: Confirm installing 'Boot Loader GRUB' by hitting 'Yes'. in the next prompt Click 'Yes' to install system as 'Read/Write'.
After the installation is done, hit 'Run Android-x86'. Voila!!!You are done. You now have Android 4.0 Ice Cream Sanwich installed in your virtual box.
If you like this post, please share it with your friends. Thanks. Enjoy Android.
Read More...