How to Access Linux Partition from Windows

Leave a Comment
Linux is the most preferred option for programmers, hackers and pen testers. But, for common people who does not have or have little programming knowledge prefer to use Windows because of its easy to use graphical design and interface. I am personally a Linux lover but have Windows also installed on my computer in another partition. If you are like me, you may be also using a dual boot computer which boots both Linux and Windows.
If you have both Linux and Windows installed on your computer and you use both operating systems in different occasions, then you may have noticed that, you can access your Windows partition when you are working on Linux, but you cannot access your Linux partition when operating from Windows. So, if you have stored some important document on your Linux partition and you need it to use when you are working on Windows, then you have no option other than rebooting to Linux and copying your files to Windows partition then again come back to Windows. However, this will take a lot of time of yours. So, if there is a way to access Linux partition directly from Windows, then is not that great? Yes, that is indeed possible to access Linux partition from Windows. I am going to tell you how to do that.
To access Linux partition from Windows, you need an application called Diskinternals Linux Reader. I will now tell you the process step by step.

Download Diskinternals Linux Reader windows application from below link.
Download

click to download

4.3 MB .exe


After downloading is completed, open the setup file to install the application. If you have low privilege, run the installer as Administrator. During installation, apply option to create a shortcut in Desktop.  
After installation is done, open the application by double clicking on the icon on your Desktop.
Now you can see all the disk partitions on your computer whether it is NTFS or FAT or ext3. You will also see the Linux Swap partitions.
Click on your Linux installed partition and open it. You will now see all files and folders present in your Linux drive. Locate your required files and copy it to your Windows drive partition.
DiskinternalsThat is it. You can now explore files on Linux partitions directly from Windows without switching into Linux. If you are helped, then please share this article. Thanks.Thumbs up
Read More...

How to install Android 4.2 (JellyBeen) on a PC, Laptop running Windows, Linux or Mac

Leave a Comment
This compact tutorial is about how to install Android 4.2 Jelly Bean on a computer running Windows, Linux or Mac or other operating system. This tutorial describes the installation process in snapshots and every caution is taken to make it easier.

          Android being the most widely used mobile operating system, rules the smartphone and tablet devices market all over the world. You can find Android really usable with handy features and tools integrated to it. Android rules the market of smartphones, tablets and phablets operating system in terms of users. Most devices in the world run Android today, more than iOS (operating system that runs on iPhone) and Windows Phone. Android runs on a specific technology called Dalvic Virtual Machine, so useful for mobile devices. However, Andorid can be installed on a PC running on Intel x86 architecture or similar. In this compact
tutorial, I am going to show you how you can install Android 4.2 Jelly Bean on a computer running a Windows operating system or a Mac or in a Linux box. I will make the things point to point ans step by step.
Requirements:
You have a computer running a full featured operating system, let it be Windows, Linux or Mac or Solaris or whatever operating system you are running. Now you want to run android Jelly Bean on it. You will basically need these things to use Android on your PC.
1.Oracle VM VirtualBox
2.Android x86 4.2 Image

How you play the olympics:

Step 1: Download Virtual Box from the official website. Download the version specific to the operating system you are running. After download is complete, you know that you are going to install Virtual Box on your Computer. So you installed it.

Download

from official website

click to download

Step 2: You have one important component now to run android on your PC. Now you need the most important one, the Android x86 4.2 Jelly Bean ISO image. Download it from below.

Download ISO

Android

click to download

Alternatively, you can go to the x86 Android official site and download a copy of ISO image from there.
Step 3: Installation of Virtua Box is done, you have downloaded the Android Jelly Bean x86 ISO image and you are ready to go. So you are looking for the next step. Open Virtual Box and select New.In the dialog box enter the name as Jelly Bean or Android or as your wish and select
i)Type : Linux
ii)Version : Other Linux and select Next.


Step 4:
In the next dialog box enter the memory size as your wish. You may grant as much as memory you want depending on the RAM you have installed on your machine.Note that minimum 512 MB is required to run Android Jelly Bean. So give accordingly and select Next


Step 5:
In the next dialog box select create a virtual hard drive now. Then select VDI and select fixed or dynamically allocated as your wish and create the virtual drive. I recommend you to choose dynamically allocated option because it will not be occupying extra space even if you are not using them.

Step 6:
Select Virtual device and select settings, a dialog box appears. In the dialog box select 
i)Storage->Storage Tree->Empty
ii)In the attributes section give the full path to the Android 4.2 x86 ISO file you have downloaded and check
Live CD/DVD, then click OK.


Step 7:
Now hit Start to start the virtual machine. In the next screen select Install Android-x86 to hard disk.

Step 8:
In the next screen select Create/Modify Partition. Then create a new primary bootable partition and select write. After finishing, select quit.

Step 9:
Now install android in sda1 and select type as ext3 , choose 'Yes' for installing grub.

Step 10:
After installation completes, remove live ISO of Android Jelly Bean x86 from Virtual Box and reboot your virtual machine. Now you can boot into Android 4.2.2 and ready to use it on your computer. Your Android 4.2 Jelly Bean is up and running.


If you liked this tutorial. please like us on Facebook. Share on Facebook, Twitter, Google+ etc. Thanks.
Read More...

How to install Android on a PC running Windows, Linux or Mac

Leave a Comment
---- This Tutorial is dedicated on the topic How to Install Android 4.0 Ice Cream
Sandwich on Windows,Linux,Mac. This is a detailed and step by step tutorial with snapshots which will help readers to install android on a PC in the easiest way. ----

Android is a powerful and robust operating system for handheld devices like mobile phones or smartphones and tablet PC's. Android is common in devices nowadays. Android is built upon a monolithic Linux kernel and hence is really powerful and secure operating system. this tutorial is on how you can install Android 4.0 Ice Cream Sandwich on a Personal computer running a Windows, Linux or a Mac OSX operating system. If you cannot afford to buy a tablet running android or you just don't want to buy one, yet you can try Android on your home PC. That is really cool. Since Android is a collaborative open source project, hence android can be downloaded for free of cost and anyone can use it as per his/her convenience. Installing android on a PC is easy but not the same as installing Windows or linux to your PC. Here I will show you how you can install Android 4.0 Ice Cream Sandwich on a PC and experience the power of Android and have fun with it.

To Install Android 4.0 on a PC, you need VirtualBox installed in your host operating system.
Follow the given link and Download the appropriate(If you are running Windows, download Virtual Box for Windows 32 or 64 bit as per the architecture of your system. If you are using Linux or Mac then download accordingly.) version of VirtualBox for your system:
Install Virtual Box. If you need guidance to install Virtual Box, please refer to the official website of VirtualBox.
The next thing you need is the Android operating system cd. Download Android 4.0 Ice Cream Sandwich ISO from this link:

Now, run Virtual Box and follow these steps to install Android in your system.

Step 1: Click on 'New' tab.

Step 2: A new Window will appear with Title 'Welcome to the new Virtual Machine Wizard'. Click 'Next'.
Step 3: Enter any name you like for the Name of the new Virtual Machine. Select 'Operating System' as 'Linux' and Version as 'Linux 2.6'. Click 'Next'.
Step 4: Select the Base Memory size (keep it at least 256 MB) and press Next.
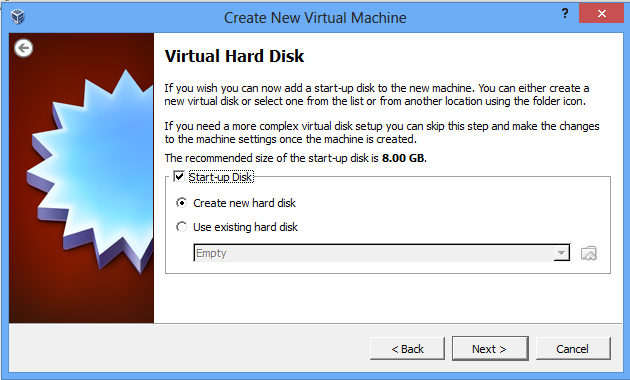
Step 5: Check 'Start up Disk' and Check 'Create new hard disk'. Click Next.
Step 6: Keep 'File Type' as VDI(VirtualBox Disk Image) and click 'Next'. For Storage Details, keep it as 'Dynamically Allocated'.

Step 7: In the next section, make the virtual hard disk size as 8 GB. Click Next and then press Create button.
 Now a new Virtual Machine is created. You now need to install Android 4.0 Ice Cream Sandwich to this virtual machine.
Step 8: Select the newly created virtual machine and click on 'Start' button shown as an arrow -> in the menu. The 'First Run Wizard' will open. Click 'Next'.

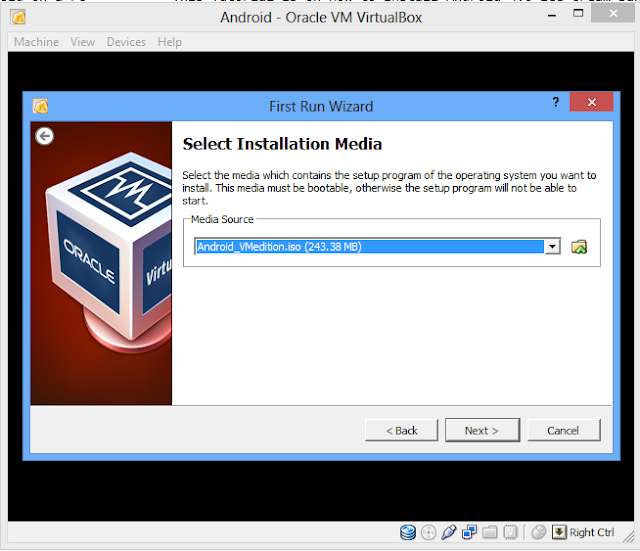
Step 9: In the next window, under 'Media Source', browse to the ISO file of Android 4.0 Ice Cream Sandwich which you downloaded earlier. Click 'Next' and then 'Start'.
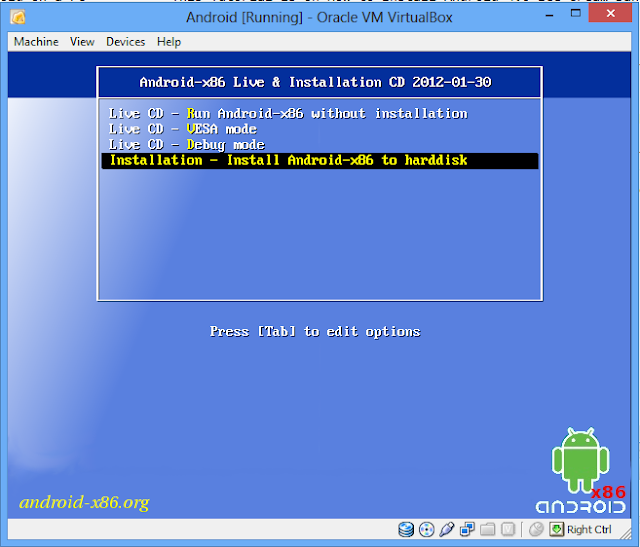
Step 10: The Android Installation Wizard will start. Use the Arrow key of your keyboard and scroll to 'Installation - Install Android x-86 to Hard Disk' and hit Enter. Alternatively you can try Android without installing choosing the first alternative.
Step 11: The installation starts. After few seconds, the installation prompt you to select a partition. Select 'Create/Modify partition' and hit 'Enter'. Next you need to hit Enter>Enter>Bootable>
Step 12: Use your arrow key and go to [Write] in the following screen. Hit 'Enter' and in the next prompt, type yes and press Enter.
Step 13: After writing the partition table, go to [quit] and press Enter.
Step 14: In the next Screen, select the first alternative and hit Enter. Next is the 'Choose Filesystem' menu. Use down arrow key and select 'ext3' and then press OK. Then cofirm formatting by pressing 'Yes'.
Step 15: Confirm installing 'Boot Loader GRUB' by hitting 'Yes'. in the next prompt Click 'Yes' to install system as 'Read/Write'.
After the installation is done, hit 'Run Android-x86'. Voila!!!You are done. You now have Android 4.0 Ice Cream Sanwich installed in your virtual box.
If you like this post, please share it with your friends. Thanks. Enjoy Android.
Read More...

How to install Windows executable softwares on Linux, Mac or Solaris

Leave a Comment
Do you really miss your windows softwares when you are working on a Linux box or a Mac?
Use Windows Software in Linux Do you wish you could use your Windows softwares like right from your Linux operating system? In general, Linux, Solaris, Mac and Windows all use different software architecture; so we cannot run Windows softwares on Linux or Linux software packages on Windows systems. But is there any way to use Windows executable softwares from Linux? The answer is definitely positive. You can run Windows softwares on Linux systems too. But to do so, you have to install another software program named Wine on your Linux box. I am operating on a Windows 7 and Ubuntu dual boot PC. Sometimes when I'm using Ubuntu, I want to run some Windows program right from Ubuntu without switching back to Windows. Wine falicitates the purpose very well. I will describe the process of installing and using Wine in simple words in this short tutorial.

What you need to have to run Windows programs on Linux?
You will have to install WineHQ on your Linux system as a prerequisite to run Windows programs. After installing Wine, you will be able to run Windows applications on other Operating Systems like Linux, Solaris or Mac.
What actually is Wine?
Wine is basically a software program which provides facility to run Windows applications right from your Linux system or other operating systems you are using. Are you a web author and miss your image authoring program Adobe Photoshop while using Linux? Well, Wine will perfectly fulfill your requirement and you will be able to run such popular windows applications like Adobe Photoshop, games like Far Cry etc. To know more about wine, you can go to the WineHQ program’s official website http://www.winehq.org.
How do I install Wine on my Linux system?
To install Wine, first download the latest stable release version of WineHQ program, or alternatively you can try installing the developer release version. To download the latest stable version of Wine, click here. To download the developer preview version click here. To select the version of your Wine installation program, visit Wine website clicking here. After downloading the installation package, extract the archive and make build and install it to your system. If you are an Ubuntu Linux user, then open the terminal and type the following:
 sudo apt-get install wine
 Enter your password if asked to, and then the installation will start automatically; and you do not need to download and install the program. You will be asked if you want to proceed, press y to proceed. You have to accept the EULA (End User License Agreement) that appears during the installation process. Press the arrow key and proceed to the finish line of the EULA and press on Accept. Your installation of Wine will be finished in a few minutes. The same process as Ubuntu will be applied to LinuxMint and other Debian based Linux flavors. To install on other versions of Linux box, download the installation package from Wine website and do the following:
a.Extract the installation package using your archive manager, and copy the extracted folder to your home folder.
b.Open the terminal and change your current directory to your home folder using the cd command.
c.Make and Install the package you have just extracted.


I have installed Wine on my Linux system. Now how I install Windows programs on it?
After installing Wine on your system, you will be eager to install and use Windows programs on it. To install any Windows program on your Wine installed machine, first download the Windows software and copy it to your Home directory. Open the terminal and type the following:
Wine
For example, if you want to install Google Chrome on wine, type 'Wine ChromeSetup.exe' without quote.

What softwares does Wine supports?
Wine supports a large number of windows applications to be run on its environment. For the full list of softwares you can run on Wine, visit the wine website or go directly clicking here.

It is showing failure installing applications. What should I do?

Wine may fail to install any windows application because of incompatibility or  incorrect architecture of your operating system; i.e. If you are using a 64 bit version of Linux and trying to install a 32 bit version of Windows application, then this is not going to work. Check the compatibility list of softwares and download the correct version. Enjoy the great experience of using Windows program right from Linux. 
Read More...

How to recover Linux After Installing Windows (Linux-Windows Dual Boot) :: The easiest way

Leave a Comment
Have you experienced the problem with booting your computer with dual copy of Linux and Windows? This is a common problem in a Windows-Linux dual boot PC. If somehow you need to re-install your Windows version, then the Linux partition disappeared. You can bring your Linux back easily. Just follow this article.

May be you had two operating systems installed in your PC, one Linux and the other is
Recover Linux After installing Windows
Windows and somehow you need to reinstall your Windows copy. After reinstalling Windows, the previous GRUB is rewritten and now your Linux system is not shown in your boot menu. Well I have also faced this problem and tried to get rid of the same and searched the net for a solution. Most likely you are not interested in formatting your Linux system and reinstalling it, because that will erase all your necessary documents and files from the Linux partition. So what to do? You want both Windows and your Linux on the same computer and you want your previous Linux installation back into work. Here I will show you some tips to get your Linux operating system back along with Windows.
If you search on the web how to recover Linux after installing Windows, most of the techies will tell you to start doing it in the terminal way writing commands in the terminal. But of course there is easier way to do this. If you are not so technically sound or do not want to remember the long commands that you need to type, then go ahead, I’m going to tell you the easiest way to get back to your Linux installation.
I’m using Ubuntu Linux and will describe the recovery process considering Ubuntu OS, but this should work on most of the Linux flavors. Here we go.
1.       Get a copy of Boot Repair CD. To download the ISO image, click here.
2.       Burn the ISO image into a CD or make your USB flash drive bootable with this ISO. To make a flash/pen drive bootable, you need to burn the ISO into it with softwares like Linux Live USB Creator (Get it from Here) or Universal USB Installer (Get it from Here). If you need help getting your flash drive bootable, please check this Hub: How to use your flash drive to try Linux without installing or install Linux from USB flash drive.
3.       Now boot with the Boot repair CD or your flash drive selecting appropriate boot device.
4.       After booting into your new OS, you will see Boot repair running. Select Recommended Recovery option. After successful recovery, reboot your computer and there you will see the list of operating systems you previously had, in the boot menu.
  There is another option to recover Linux system if you don’t want to try the above described option. This is how you will do this:
First you need to have a live copy of your Linux CD. If you do not have one, then download one from the web and burn it to a CD. Alternatively, you can make a live flash drive or pen drive using the live CD. To make flash drive bootable, see above description.
After getting the Linux distribution and equipped with your live version of it, you are ready to go. Boot into Linux using your live CD or flash drive. Then install Boot Repair typing the following commands to the terminal:

sudo add-apt-repository ppa:yannubuntu/boot-repair
sudo apt-get update
sudo apt-get install boot-repair

or type this:

sudo add-apt-repository ppa:yannubuntu/boot-repair && sudo apt-get update
sudo apt-get install -y boot-repair && boot-repair


after getting installed, click on recommended recovery option and it will recover your previous boot options. Reboot your computer and see in your own.    
Read More...

How to make your flash drive bootable to try Linux without installing it

Leave a Comment
Hello everyone. Nowadays, most of the Linux distributions allow you to try the operating
system before you install it into your computer. This is very helpful if you don’t want to install a Linux variant in your computer but just try one. Or if your system is somehow crashed and you have to format the whole partitions of your computer but you need to back up your files and documents/data from that machine, then booting it using a Linux Live CD may be extremely helpful. Today, most of the Linux distributions like Ubuntu, Debian, fedora, Open SUSE, Linux Mint, Free BSD, Arch Linux, CentOS, Clone Zilla and many more provides option to run the Operating system Live from an USB flash drive. If you do not have a CD ROM drive in your computer, then also this option will be very helpful to get you installed a Linux flavor on your machine. Okay, now come to the point and get your USB flash drive bootable with your Linux distribution version. Here the steps involved:
1.       Get a copy of one of the following softwares:
a.       Linux Live USB Creator (Get Here)
b.      UnetBootin (Get Here)
c.       Universal USB Installer (Get Here)
2.       Download a copy of ISO image of your intended Linux version.
3.       Install and run one of the previously mentioned USB creator software.
4.       Select the ISO image as source to burn to the USB device. Insert the flash drive and start making copy of Linux to your flash drive.

5.       After completion, reboot your computer with the USB flash drive as the Boot device. Try or install the Linux flavor from your live USB.
Read More...

How to use MTS Mblaze on Linux, Ubuntu 11.04, 12.04 or higher

1 comment
MTS MBlaze is supported in Windows, Linux and Mac OS. But some users experience

problem getting it connected to the Internet while using on a Ubuntu machine. MTS MBlaze can easily be set up in Ubuntu in two easy ways.

  • Using driver software which included in the modem itself.
  • And without any driver software.

Using recommended driver software to set up MTS Mblaze

The modem itself contains the driver software for both RPM and DEB based GNULinux distros, Mac OS and Windows. From the given packages, Ubuntu users have to install CrossPlatformUI-V2.1.2-SSTL-i386-ubuntu.deb package. If you are using 32 bit Ubuntu then quite easy to install the package. Just install it after connecting the USB Modem. But, if you have 64 bit Ubuntu then this one is not going to work as it is build for 32 bit systems only. For that we need to re-build this 32 bit only debian package into 64 bit also driver software.
If you are not familiar with executing commands in terminal or do not want to spend your valuable time, simply download the package provided below which we had re-built ourselves.
And install this package by simply double clicking on it after connecting the modem. It should work fine.
Alternatively, to install the 32 bit package as a 64 bit driver software,perform the following actions(In this case, you need a working Internet connection):
1. First you need to install Dpkg. Dpkg is a terminal based application that help to install, remove, unpack, build the *.deb package files.
2. To install Dpkg, connect to Internet and execute sudo apt-get install dpkg in terminal.
3. Extract CrossPlatformUI-V2.1.2-SSTL-i386-ubuntu.deb file.
4. Open extracted directory->DEBIAN and open control file in a text editor.
5. Now replace the Architecture from i386 to all.
6. Save the file and close it.
7. Now to make a new .deb file, execute sudo dpkg -b in your terminal.
For example, sudo dpkg -b CrossPlatformUI-V2.1.2-SSTL-i386-ubuntu CrossPlatformUI-V2.1.2-SSTL-ALL-ubuntu.deb
Now you will find new CrossPlatformUI-V2.1.2-SSTL-All-ubuntu.deb file has built along with the extracted directory. This is the same one which we have provided above to download. Install this driver package after connecting the USB Modem. 

Without any driver software

MTS MBlaze USB Modem also can be used without installing driver software since latest version of Ubuntu (or any other GNULinux distro) support this modem by default. It should be at least 10.04 or greater version of Ubuntu.
Connect the modem with the PC. The system will detect the device automatically.
Look out for the notification saying Device recognized USB Modem, ONDA Communication S.p.A., then click on the icon of Network Connections in system tray.
You will find an option New Mobile Broadband (CDMA) Connection, click on it.
A new window will open to setup a mobile broadband connection. Click Forward button
Select India as country, then Forward,
Select MTS MBlaze from the providers’ list, Forward,
And then click Apply,
Now Disconnect the connection which is trying to connect automatically. Because it is not going work until we provide username and password.
Open Edit Connections->Mobile Broadband (Tab)->Select MTS MBlaze Connection and click onEdit.
Under Mobile Broadband, type internet@internet.mtsindia.in as username and MTS aspassword.
Check Available to all users and Connect automatically if you want.
Save it and close Network Connections.
Now unplug the modem from the port and reconnect it.
After the modem get recognised by the system, try to connect Internet.
If everything goes right, you will see that your Internet connection will get connected.

Third Method:

There is another method to connect to Internet via MTS Mblaze modem. You do not need proprietary driver software, but need to install one small application. MTS Mblaze maynot work on all systems running Ubuntu 12.04 or Higher. Here is how you can solve the problem.

1. Install wvdial running the following command in your terminal:
    sudo apt-get install wvdial

2. Install usb-modeswitch and usb-modeswitch-data from Ubuntu Software Center (Just search for the packages and hit install)

3. Edit /etc/wvdial.conf file running the following command:
    sudo gedit /etc/wvdial.conf

4. Add the following lines to the file:


[Dialer mts]
Stupid Mode = 1
Inherits = Modem0
Password = mts
Username = internet@internet.mtsindia.in
Phone = #777
[Modem0]
Init1 = ATZ
SetVolume = 0
Modem = /dev/ttyUSB0
Baud = 115200
FlowControl = Hardware (CRTSCTS)
Dial Command = ATDT

5. Save the file, close it and issue:
    sudo wvdial mts

This will give an output similar to:


--> WvDial: Internet dialer version 1.61
--> Initializing modem.
--> Sending: ATZ
OK
--> Modem initialized.
--> Sending: ATDT#777
--> Waiting for carrier.
ATDT#777
CONNECT 3100000
--> Carrier detected.  Starting PPP immediately.
--> Starting pppd at Sun May  6 18:35:05 2012
--> Pid of pppd: 7231
--> Using interface ppp0
--> local  IP address 116.202.159.156
--> remote IP address 10.228.138.131
--> primary   DNS address 10.228.129.114
--> secondary DNS address 10.228.129.113

If you get an error, disconnect your device. Reconnect and wait for about 20 seconds. Then issue this command from terminal:
sudo wvdial mts

Leave the terminal as such. Open your browser and check if internet is working or not.
To disconnect internet, kill the process by pressing Ctrl+c in the terminal.

You can also create an alias to this command.
Edit .bashrc in your home folder and add the following line to it:

alias mts='sudo wvdial mts'

Save it.
Now, you can start using MBlaze just by issuing mts.

Note: Credentials you need to remember:
Username: internet@internet.mtsindia.in 
Password: MTS or mts
Number: #777

(The information provided in this post is not original, it is collected from various sources in the Internet and I am just reposting...Hope this will help you.)
Read More...

Skype is not working on Ubuntu 13.04 | How to Solve the Problem


Is your Skype program not working properly on Ubunut 13.04 Raring Ringtail? Some people have experienced problems in using Skype after they have installed Ubuntu 13.04 or they
have upgraded to Ubuntu 13.04. Well, if you are experiencing the same problem , you are certainly not alone having the same problem. And here I am to help you troubleshoot the problem of Skype on Ubuntu13.04. People with Nvidia graphics drivers are mostly having this problem with Skype, like Skype not opening or it gets crashed. Here is how you can solve the problem and run Skype on Ubuntu 13.04 properly.

1. To solve problem of Skype not working in Ubuntu 13.04 Raring Ringtail with proprietary Nvidia or AMD graphics drivers, let us first rename the Skype executable from "skype" to "skype-bin". Do run this line in your Terminal:
sudo mv /usr/bin/skype /usr/bin/skype-bin

2. In second step, Let us create a file called "skype" under the directory /usr/bin/ . We can use Gedit to create a file nammed skype in the mentioned directory as follows(Note that you need to be the root):
gksu gksu gedit /usr/bin/skype

In this file, copy and paste the following code:
#!/bin/sh
export LD_PRELOAD=/usr/lib/i386-linux-gnu/mesa/libGL.so.1
exec skype-bin "$@"

Now save the file.

3. And in the final step, run the following command in a terminal:
sudo chmod 0755 /usr/bin/skype


You are done. Now your Skype should work in Ubuntu 13.04 Raring Ringtail properly. See it Yourself.

If you want to revert the changes made by using the instructions above, run the following commands in your Terminal:
sudo rm /usr/bin/skype
sudo mv /usr/bin/skype-bin /usr/bin/skype


Enjoy the power of Ubuntu.
Read More...

Ubuntu 13.04 (Raring Ringtail) Beta Reviews and Download

Ubuntu has released its 13.04 beta version few days back. The beautiful and more elegantly powerful Linux operating system comes with numerous new features and functionalities. The new release of Ubuntu carries speedy processing, beautiful design and animations, online accounts etc. Here are some features of Ubuntu 13.04 which were listed in http://www.omgubuntu.co.uk.   
1. Great speed of processing.
2. Window Switching mode.
3. New Lenses
4. New Bluetooth Menu
5. New Workspace Items
6. New Synchronization Menu
7. Per-App account Toggle
8. New Shutdown Dialogues
9. New Unity Preview Animations
10. New window Snap Animation

You can Download the iso file for the beta release of Ubuntu 13.04 (Raring Retail) 32-bit version (i386) from here. 64 - bit version (amd64+mac) here
Read More...

How to install and use Java Media Framework (JMF) in Ubuntu LInux

1. Download JMF for Linux from the official oracle website, or you can download a JMF version from Google Code using this link: https://clusteredserver.googlecode.com/files/jmf-2_1_1e-linux-i586.bin
I tried to compile and run the .bin installer but it showed error. I solved this problem by a trick.
2. Rename the .bin file with .zip extension like(JMF-2.1.1-e.zip)
3. Extract JMF ziped folder to your Home directory.
Run these commands
export JMFHOME=/home/<yourusername>/JMF-2.1.1e
export CLASSPATH=$JMFHOME/lib/jmf.jar:.:$CLASSPATH
export LD_LIBRARY_PATH=$JMFHOME/lib:$LD_LIBRARY_PATH

Installing C shell:
You can install C shell on your existing Unix using the following command:
 sudo apt-get install tcsh
Now type csh in your terminal to go to C shell. On C shell, run 
setenv JMFHOME /home/mrinmoy/JMF/JMF-2.1.1e/
setenv CLASSPATH $JMFHOME/lib/jmf.jar:.:$CLASSPATH
  1. Set your LD_LIBRARY_PATH (shared libraries path) to point to the JMF libraries. For example:
  2. setenv LD_LIBRARY_PATH $JMFHOME/lib:$LD_LIBRARY_PATH

    If you are using an IDE to develop programs using JMF, you need to add the JMF jar file to your projects external jars, else programs written using JMF library will show some errors. To add JMF to Eclipse IDE, do :
    Start a project on Eclipse, Right Click on the project and click on 'Properties'. In the new window, click on 'Add external jar'. Browse through the directory where you have saved JMF and add jmf.jar.
    Hope this post helps you developing programs using Java Media Framework.
Read More...

How to Record your desktop in Ubuntu/Linux with Record My Desktop

Why record your desktop? 
Recording the desktop activities for some moments will make you a video of your desktop transitions in that time. But what is special with it? Yes, there is something special. I wanted to make a tutorial video, instructions depicting in my desktop and wanted to upload it to youtube so that others can get benefited. You can create spectacular videos with instructions to do something recording your desktop activities so that others can easily understand what to do step by step in an easy manner. And viewing something is easier to learn than reading it, right? So, I tried to get a software so that I can record my desktop. There are numerous applications available to achieve this for Windows and Mac. I found one named Record my Desktop for Linux which elegantly serves my purpose. Here I am going to tell you how you can install and use Record my Desktop to make videos of your desktop activity. I am using a Ubuntu box and my tutorial will be based on it.
1. First install Record my Desktop to your computer. Open the Terminal (Ctrl+Alt+t) and type the following:
sudo apt-get install gtk-recordmydesktop
2. After installation completes, run the application by typing recordmydesktop in the terminal. Alternatively you can use Unity panel to search for Recordmydesktop and then start it.
3. Select the window area which you want to record or select whole desktop as the recording space.
4. you can stop the recording by pressing ctrl-c or in gui-front just click record, and just click the white square on system tray to stop.
5. The application outputs your screen recorded video to a .ogg file. To convert it into .avi, you can use mencoder.
6. To install mencoder, type the following into your terminal and hit enter:
sudo apt-get install mencoder
7. Now to convert the ogg video named as suppose 'input.ogg' for examples shake to an avi video named output.avi, run the following command to the terminal:
mencoder -idx input.ogg -ovc lavc -oac mp3lame -o output.avi
Now you can record your desktop easily and can create awesome tutorials and upload to websites like Youtube or whatever you want.
Time-saving Tip: Check the 'Encode on the fly' option to save time for encoding videos after recording. To do so, Click on 'Advanced' button, then in the new window, go to 'Performance' tab and Check the 'Encode on the Fly' option. 

Hope this helps you. Enjoy!!!
Time-saving tips screenshots:


Read More...